How to Build Your Own FREE SMTP Server with Postal — Complete Beginner’s Guide
Are you tired of paying too much for email services like SendGrid, Mailgun, or Amazon SES?
What if I told you that you can build your own professional SMTP server for just the cost of a VPS (around $4/month) and send unlimited emails?
I’ve personally set up this exact system, and it works flawlessly.
In this guide, I’ll walk you through every single step to create your own production-ready SMTP server using Postal completely for free.
What you’ll achieve by the end of this guide:
- A fully functional SMTP server running on your own VPS
- Complete control over your email delivery
- Protection of your main server’s IP reputation
- Unlimited transactional and marketing emails (when properly warmed up)
- Professional SSL-secured email infrastructure
Why Self-Host Your SMTP Server?
Before we dive into the technical setup, let’s understand why you should consider self-hosting your email infrastructure:
- Cost Savings: Email services charge per email sent. SendGrid starts at $15/month for 40K emails. With your own SMTP server on a $6/month VPS, you can send millions of emails at no additional cost.
- Complete Control: No more worrying about account suspensions or sudden policy changes. Your server, your rules.
- IP Reputation Protection: By using a dedicated server for emails, you protect your main application server’s IP from potential blacklisting.
- Unlimited Sending: Once properly configured and warmed up, you’re not limited by arbitrary sending quotas.
- Data Privacy: Your email data stays on your servers, not flowing through third-party services.
Important Note: This setup requires port 25 to be open on your VPS.
Many providers block this port to prevent spam. I recommend Contabo because they have port 25 open by default, making this process much smoother.
⚠️ IMPORTANT DISCLAIMER – PLEASE READ
This guide is intended for legitimate business use only. Setting up your own SMTP server comes with significant responsibilities and legal obligations.
Acceptable Use:
- ✅ Transactional Emails: Order confirmations, password resets, account notifications
- ✅ Opted-in Communications: Newsletters to subscribers who explicitly signed up
- ✅ Business Communications: Emails to existing customers who expect to hear from you
- ✅ Development/Testing: Testing email functionality in your applications
Strictly Prohibited:
- ❌ Spam: Sending unsolicited bulk emails
- ❌ Purchased Lists: Using email lists you bought or scraped
- ❌ Deceptive Content: Phishing, scams, or misleading information
- ❌ Violating Laws: Breaking CAN-SPAM Act, GDPR, or other email regulations
Setting Up Postal Step-by-Step
Now comes the exciting part – let’s install Postal and get your SMTP server running!
Step 1: Set up your VPS
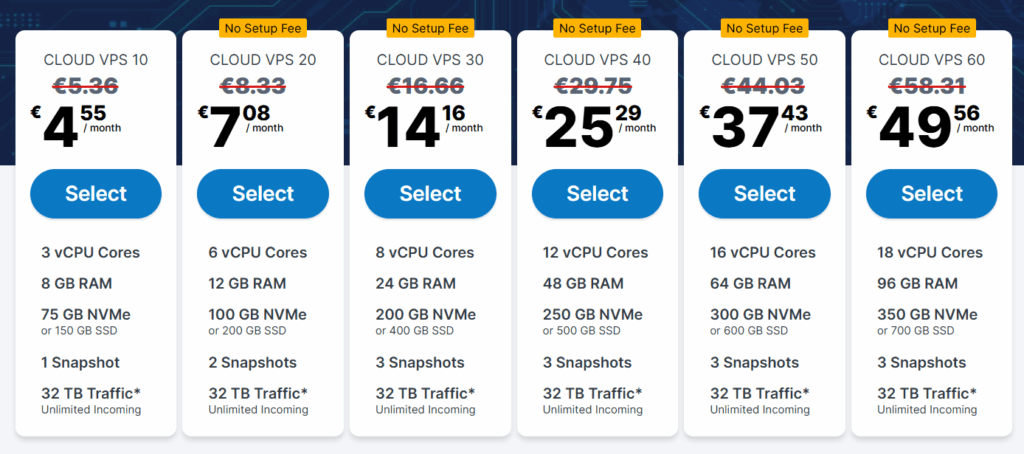
The first step is to set up a virtual private server (VPS) on a cloud server. I’ll be using Contabo for this case because it provides good infrastructure at a reasonable price, with port 25 open by default.
If you plan to choose another VPS provider, make sure to check if port 25 is open using my free port checker before you do anything
Anyways, with Contabo you can start with the ~5$ plan and scale up when needed:
Step 2: Connect to Your Server
Now, use an SSH client of your choice or even your terminal to log in to your server. I’ll be using Termius because it makes it easy to do so. But if you choose to use a terminal, run:
ssh root@YOUR_SERVER_IP
Replace YOUR_SERVER_IP with the actual IP address Contabo provided, you should get something like this:

Step 2: Update System and Install Base Tools
Once we’re in, let’s start by updating the system and installing essential tools:
sudo apt update && sudo apt upgrade -y
sudo apt install git curl jq -y
This ensures your server has the latest security updates and the tools we need for the installation.
Step 3: Install Docker
Postal runs on Docker, so we need to install it:
curl -fsSL https://get.docker.com | sh
Wait for the installation to complete. This might take a few minutes.
We also need Docker Compose Plugin for managing multiple containers:
sudo apt install docker-compose-plugin -y
Step 4: Test Docker Installation
Let’s verify Docker is installed correctly:
docker --version
You should see output showing the Docker version. If you get an error, restart your server and try again.

Step 5: Clone Postal Installer
Now let’s get the Postal installation files:
git clone https://github.com/postalserver/install /opt/postal/install
sudo ln -s /opt/postal/install/bin/postal /usr/bin/postal
This downloads Postal and creates a symbolic link so you can run postal commands from anywhere.
Step 6: Install MariaDB
Postal needs a database to store its data. Let’s install MariaDB:
docker run -d \
  --name postal-mariadb \
  -p 127.0.0.1:3306:3306 \
  --restart always \
  -e MARIADB_DATABASE=postal \
  -e MARIADB_ROOT_PASSWORD=your_password_here \
  mariadb
Important: Replace your_password_here with a strong password. You can easily generate one using my Free secret key generator.
Write it down – you’ll need it later!
Step 7: Bootstrap Postal
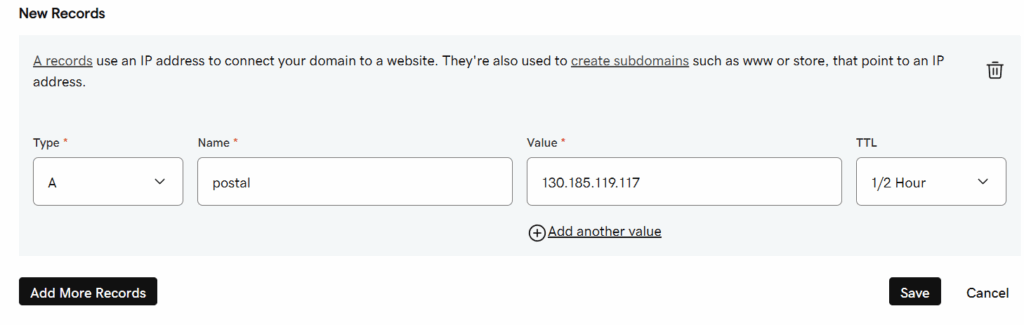
Now we’ll initialize Postal to a subdomain we own, so go to your domain provider, then navigate to the DNS records, and add a new A record with the name set to postal, which will be our subdomain, and the value is the IP address of your own VPS, so you’ll get something like this, but with your IP:
Then, run this command to bootstrap Postal with your domain:
postal bootstrap postal.yourdomain.com
Replace postal.yourdomain.com with your actual subdomain.
Step 8: Configure Postal Settings
Edit the Postal configuration file:
nano /opt/postal/config/postal.yml
The following file will open:
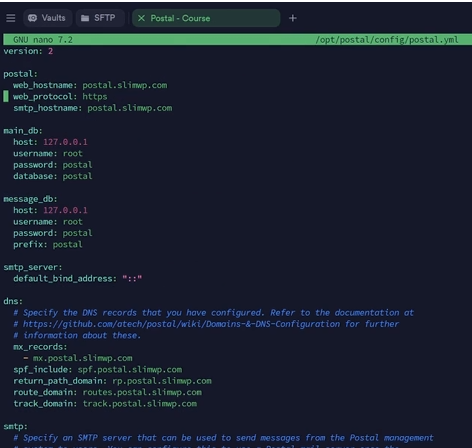
In this file, you’ll need to set the database password (the one you used for MariaDB) in these sections:
main_db:
  host: 127.0.0.1
  username: root
  password: your_mariadb_password_here
  database: postal

message_db:
  host: 127.0.0.1
  username: root
  password: your_mariadb_password_here
  prefix: postal
Save the file with Ctrl+O, Enter to override, and Ctrl+X to exit.
Step 9: Initialize Postal Database
Now let’s set up the database structure:
postal initialize
Wait a couple of minutes for it to create all the necessary database tables and configurations.
Step 10: Create Admin User
Create your admin user account:
postal make-user
Follow the prompts to create your admin account. You’ll use these credentials to log into the Postal web interface.
Step 11: Start Postal
Finally, let’s start the Postal server:
postal start
Postal should now be running! But, before navigating to it, we’ll need to set up Caddy so we can access Postal with our subdomain with a secure SSL.
So, just run this command:
docker run -d \
  --name postal-caddy \
  --restart always \
  --network host \
  -v /opt/postal/config/Caddyfile:/etc/caddy/Caddyfile \
  -v /opt/postal/caddy-data:/data \
  caddy
Now you can access your Postal server securely at https://postal.yourdomain.com!
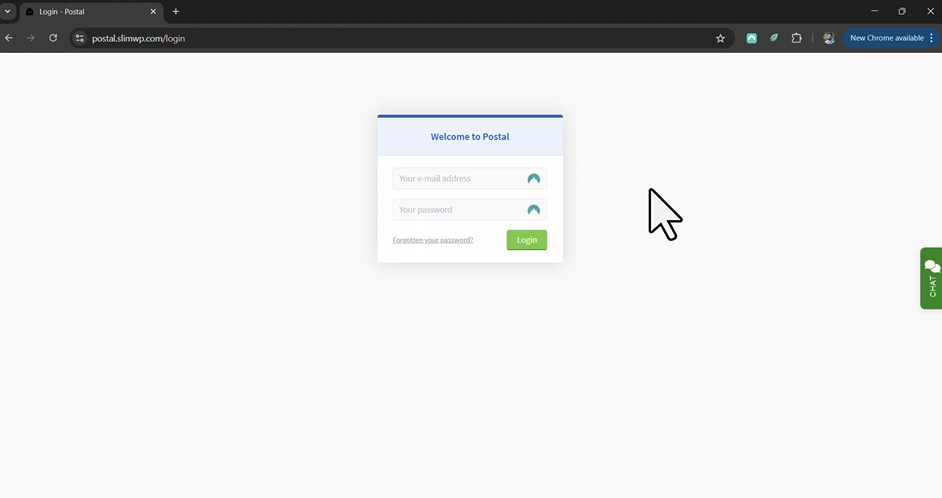
Log in using the credentials you set above when creating your admin user.
DNS Configuration Made Simple
This is where many people get stuck, but I’ll break it down into simple terms. Think of DNS records as instructions you give to the internet about how to handle your emails.
Understanding DNS Records (Explained Simply):
| Record Type | What It Does | Explained Like You’re 12 |
|---|---|---|
| SPF | Tells the internet which servers can send email for your domain | Like giving the post office a list of people allowed to use your return address |
| DKIM | Adds a digital signature to prove emails are really from you | Like signing your letter with a secret pen only you own |
| Return-Path | Where bounced emails go if delivery fails | Like putting your return address on an envelope |
| rDNS/PTR | Links your server’s IP back to your domain name | Like someone checking your phone number and seeing your real name |
Step-by-Step DNS Setup:
Once you’re in your Postal dashboard, you’ll have to connect the domain we added above. So, navigate to the Domains tab and add your main domain (not the subdomain) like this:
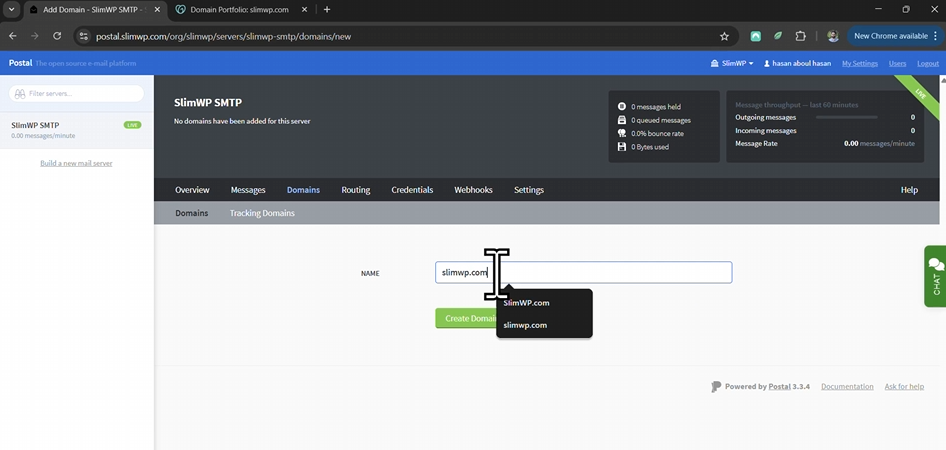
And, now we’re set to configure our DNS records to complete our mail server directly from here:
So, navigate to your domain provider as we did above when we set up our Postal subdomain, and add the following records that Postal provided.
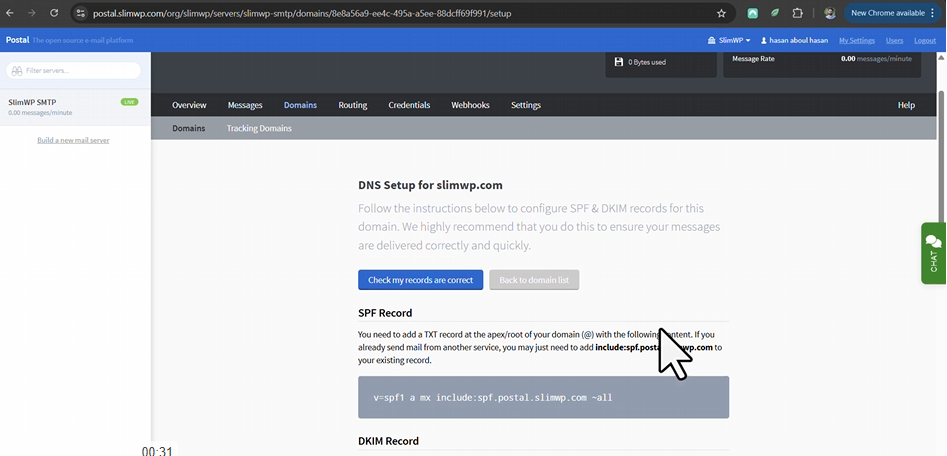
1. SPF Record (Sender Policy Framework)
The SPF record tells email providers that only your server can send emails for your domain.
Add this TXT record to your domain:

Replace YOUR_SERVER_IP with your actual server IP.
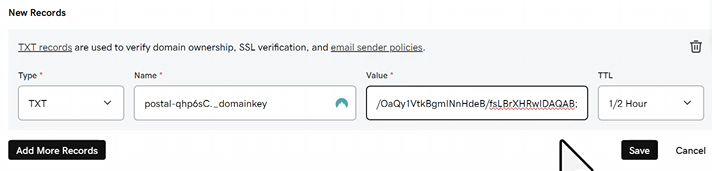
2. DKIM Record (DomainKeys Identified Mail)
The DKIM record provides a way for email providers to verify that your emails haven’t been tampered with.
Directly below the SPF record on Postal, you’ll find your DKIM name and value, where you’ll add them like this:
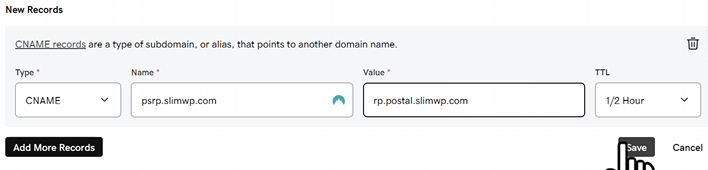
3. Return-Path (Handled automatically by Postal)
Now, for the return path, it’s the same as we did above, but instead of a TXT record, we’ll add a CNAME record like this:
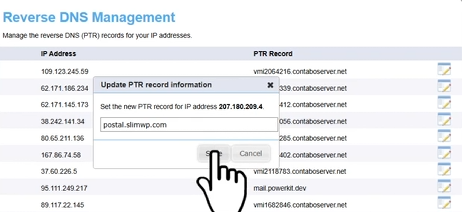
4. rDNS/PTR Record (Reverse DNS)
Email providers check this to ensure your server isn’t spoofing. Without it, your emails will likely go to spam. I will go through the steps of how to set it up on Contabo, it should be very similair in other VPS providers too:
- Log into your Contabo Customer panel
- Go to your Reverse DNS Management section
- Find the IP address of the VPS you used to deploy Postal on
- Cick on edit and change the domain to your own:
mail.yourdomain.com
Here’s an example from my case:
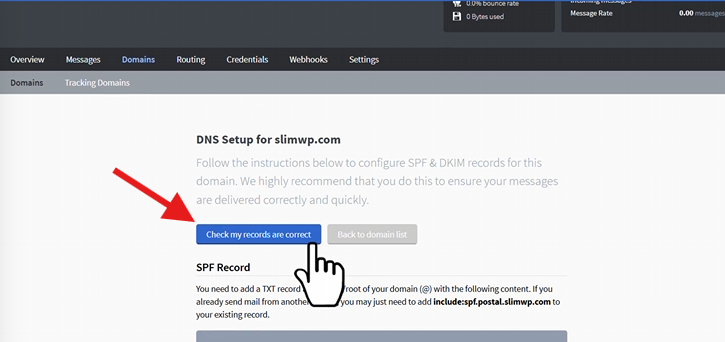
Now, after setting these 4 records, scroll to the top of the page on your Postal dashboard and check if your records are correctly set:
And after a couple of minutes, it should show you this:
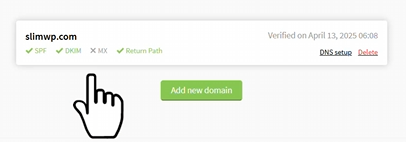
Note: Sometimes it may take up to 24-48 hours for all the DNS records to finish propagation.
Testing Your Email Setup
Now comes the moment of truth – let’s test if your SMTP server works!
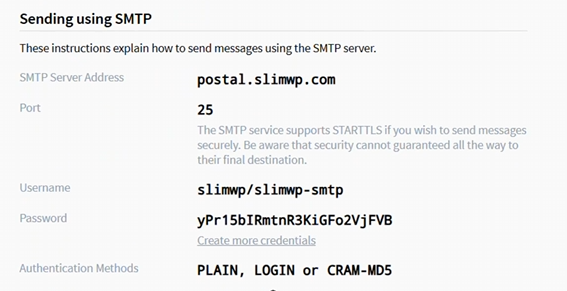
Navigate to the credentials section and create your credentials if you still haven’t. Here are my Test credentials from my dashboard:
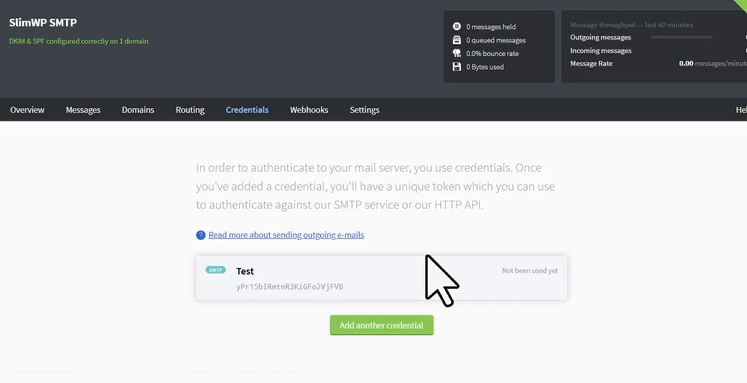
Click on the Read more about sending outgoing e-mails to get the credentials you need to test your email:
Now, go to my free SMTP Tester tool on PowerKit. This tool will:
- Test your SMTP connection
- Check authentication
- Verify email delivery
- Show detailed logs of any issues
Simply enter your SMTP credentials:
- Host:
postal.yourdomain.com - Port: 25
- Username: [From Postal admin panel]
- Password: [From Postal admin panel]
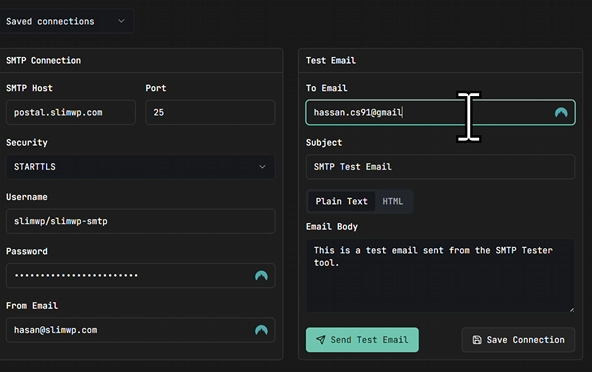
Click on Send Test Email, and you should get this:
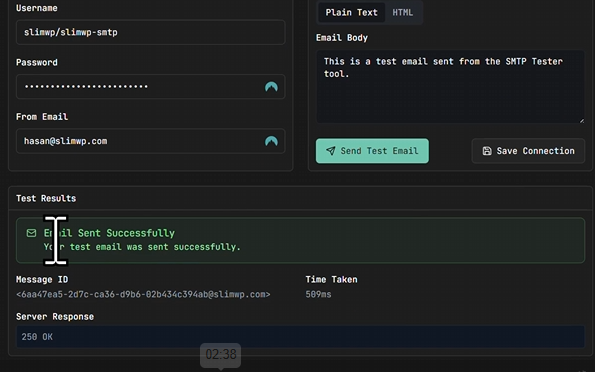
Congrats! Our SMTP is up and running!
But, that’s not enough for our SMTP to function properly, where we have to do something called Email Warming Up.
Email Warmup Strategy
Critical Warning: Don’t start sending thousands of emails immediately! Your new IP address has no reputation, and bulk sending will land you in spam folders or get you blacklisted.
The IP Warmup Process
Email warmup is gradually building your IP’s reputation with email providers. Here’s why it matters:
- New IPs are treated with suspicion
- Sudden high volume = spam in the eyes of ISPs
- A gradual increase builds trust
- Good engagement rates improve reputation
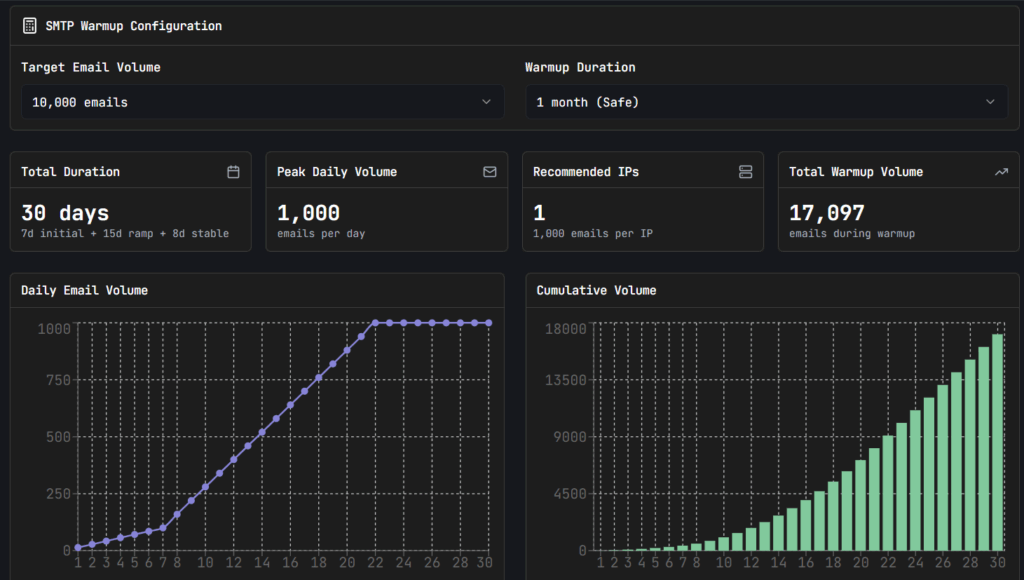
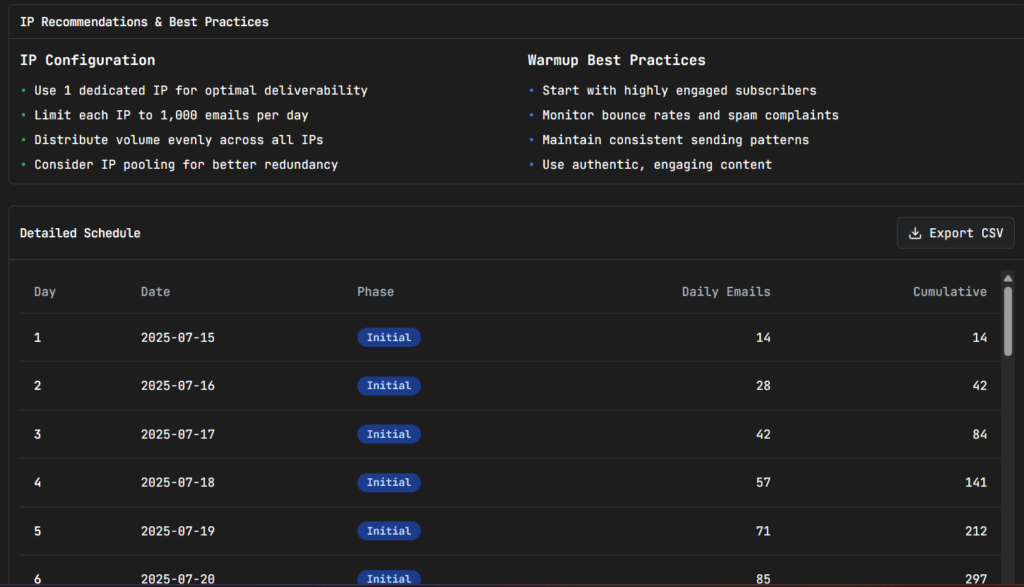
I’ve created a free tool to help you plan your warmup strategy: SMTP Warmup Scheduler on PowerKit.
Depending on your target email volume and testing duration this tool provides:
- Day-by-day sending schedule
- Volume recommendations
- Recommended number of IPs to use
- Best Practices
What’s Next?
Congratulations! You now have a fully functional, production-ready SMTP server running on your own infrastructure. But this is just the beginning of your email mastery journey.
Don’t forget with great power comes great responsibility. Use your new SMTP server ethically:
- Only send emails to people who want them
- Follow email marketing best practices
- Respect unsubscribe requests immediately
- And most importantly, DONT SPAM
The email world will welcome you if you play by the rules, but it will quickly blacklist you if you don’t.
What are you planning to build with your new SMTP server? Drop a comment below and let me know how this guide worked for you!